Monday 27 April 2015

Health and safety in the workplace

Health and Safety in the workplace

Make-up

- Before applying any cleanser toners or moisturisers to a clients skin, make sure they are not allergic to any of the products. If the client has rather sensitive skin, there are sensitive skin cleansing  products which will be more suitable for the clients skin.

- Before Applying any make up products to the skin make sure the client is not allergic to any products, if the client experiences any red rashes or itching due to the product remove immediately under cold running water.

- when using special effect products such as latex , before applying to the clients skin make sure they are not allergic to any of the products. Test the latex on a small area of the skin using a cotton bud before applying fully to the skin, if the area becomes red or itchy remove immediately and do not use the product, run under cold running water also to reduce the red and itchiness. Products such as gelatine which does not contain any latex can be used as an alternative. If a clients skin is sensitive apply a barrier cream to the area before applying the latex.

- Make sure each time you apply make to a client, wash your brushes fully to avoid infection .

- wash your hands before applying makeup to a clients skin.

- tie your hair back before applying any makeup to a clients.

- remove any jewellery before applying makeup.

- make sure the work station is tidy at all times when applying make up to a client.

- treat your client with care.

- apply couch roll to your workstation before setting up your products and applying makeup to the client.

Hair

- Apply couch roll to the work station before setting up your equipment and working on a clients hair.

- Wash your hands before working on a clients hair

- Tie your hair back before working on a clients hair.

- Treat your client with care.

- Make sure the client is not allergic to any products such as hairsprays or shampoo and conditioners , if the client has a sensitive scalp there are shampoo and conditioners available for clients who have a sensitive scalp.

- When using heated appliances such as curlers or straighteners be cautious not to burn the clients scalp.

- When sectioning the clients hair make sure you do not dig the pin tail comb into their scalp.

- When securing hair in place, using hair pins make sure you do not scrap the clients scalp with them.

Monday 30 March 2015

dark lips and eyes

Dark lips and eyes

Before creating a smoky eye and red lips inspired makeup look I firstly searched for some makeup looks which I could use as an inspiration for my own interpretation.

I chose this image due to liking how the face was contoured, its subtle and doesn't take the focus away from the eyes and the lips. The eye application is smoky and really brings out the blue eyes, the colour has great depth but isn't too dark. The lip application is very bright and brings the audience attention straight to the lips.

Before crating  a dark eyes and lips inspired makeup look I firstly created a face chart inspired by the image. Firstly I used my illamasqua sculpting powder to contour the face then used the illamasqua blush powder to apply colour to the cheeks. next I used the deep red from my Kryolan lip pallet to add colour to the lips I then used my black eyes shadow from my kryolan pallet to add an outline around the lips. Next I used a black from my illamasqua neutral pallet to highlight around the eyes and a cream from my reflection pallet to highlight underneath the brows. Finally I used my fine liner brush an my black supracolour to add detail around the eyes.
Anoymous. (12/05/13). eye makeup,lips,lipstick,makeup,manicure and nails. Available: http://favim.com/image/722803/. Last accessed 30/03/14.

I chose this image as an inspiration for my own interpretation of dark eye makeup, I really how the eye application has been applied, the metallic brown colour brings out the eye colour an also draws attention to the brows. The contouring on the face Is also soft and compliments the eye makeup. 


I created a face chart inspired by the dark eyes style of makeup. Firstly I used my illamasqua sculpting powder to highlight the convex areas of the face. Next I applied a black from my illamasqua neutral pallet around the eyes using me blending brush. Then using the brown from my illamasqua neutral pallet I blended the colour into the eyelids using my rounded blending brush, I then used the white from the illmasqua neutral pallet to highlight under the brows. Finally to bring out the eyes I used my black supracolour and fine liner brush to create some lashes and act as a eyeliner. Finally to complete my makeup look I used a nude from my camouflage pallet to add application to the lips.

I really liked the outcome of my face chart I felt the eye makeup application really brought out the eyes and I also contoured the face chart well.

creating dark eyes and lips.

lesson summary creating dark eyes and dark lips inspired by gothic horror.

Health and safety.
makeup sure the client is not allergic to any cleansers toners or moisturizers or any of the products used. If the skin becomes red or itchy remove immediately using cold running water. If the client has sensitive skin used cleansers and products which are suitable for their skin type.

equipment
-primer
-foundation
-translucent powder
-illamaqua sculpting powder
-illamaqua blusher pallet
-illamaqua neutral pallet
-mascara
-gel eyeliner
-dark lipstick

Firstly I applied a primer to the skin to give the makeup a better finish.
Then I applied a foundation to my neck face and ears using my foundation brush.
once the foundation looked even I then used a translucent powder by MUA to set the makeup base.
Next I used my sculpting powder by illamasqua to contour the face.
Then I applied a light pink from my illamsaqua blush pallet to my cheekbones to add more depth.
Then I applied a brown from y neutral illamasqua pallet to my eyelids.
Using my black from my neutral pallet by illmasqua and my rounded blending brush I applied colour to the socket areas of my eyes to create the Smokey eyes effect.
I then used the cream from my reflection pallet and white from my illmasqua neutral pallet to highlight underneath my brows.
In order to make my eyebrows appear more sharp I brush a small amount of brown from my neutral pallet through the brows.
Using my Maybelline gel eyeliner I outlined my eyelids by creating an eyeliner flick.
Finally I applied a mascara to my eyes.
In order to complete my look  applied a deep red colour to my lips.


I was quite happy with the outcome of my dark eyes dark lips inspired makeup I feel it shows an element of gothic horror. I also feel I interpreted the dark smoky eye makeup well , Even though I contoured the skin I felt it looked subtle and did not take the focus away from the dark eyes and dark lip application
 I also attempted to create a dark eyes and lips makeup style on an older skin type. Firstly I applied an olive foundation to the face. Then I blended the product into the hairline using my buffer brush. Once the product looked even I then applied a loose illamasqua powder to the skin. Using my summer tan I then contoured the convex areas of the face, I then used the blush mauve from my glamour glow Kryolan pallet to act as a highlighter highlighting the lighter areas of the face. The using the brown from my neutral illamasqua pallet I applied colour to the brows and the eye lids. I also used the black from the neutral colour pallet to highlight the eye sockets and the white from the pallet to highlight underneath the brows and the lighter areas of the eyelids Finally to complete my look I applied a bright red lip colour to the lips.

I was very happy with the outcome of my dark eyes and lips makeup, although it looked better off camera, I found it difficult to find a lighting which would compliment my style of makeup most. I also found it difficult to apply makeup around the eye area due to the skin being a little aged. I felt the light contouring underneath the eyes was an advantage and helped the eye makeup to appear darker.
 

Consultation notes


Client 2:
Name: Jenny
Age: 53
Skin Type: dry , older skin type
Skin Tone: Olive
eye colour: brown
notes: olive skin tone, slightly dry and older skin.

Client 3
Name: Heidi (myself)
Age: 20
Skin type: dry
Skin tone: olive
Eye Colour : Brown
Notes: Olive skin tone / olive kryolan foundation base


Victorian hair inspired by gothic horror

Victorian hair inspired by gothic horror

Lesson summary: learning three different hairstyle techniques which relate to the Victorian era and are also inspired by gothic horror.

Health and safety: be carefully when using the curlers to create the Victorian inspired hair be careful not to burn yourself or the clients scalp due to the appliance being hot.

equipment :
hair pins
curlers
paddle brush
dolls head
sectioning clips
pin tail comb.

In order to create set style curls, firstly create a side parting using the pin tail comb.
The curl the two sections of hair at the front of the head to the temples this is usually about three curls on the side with the centre parting and two curls on the other side.
when curling the sections firstly create sharp sections using the pin tail comb situate the curlers at the end of the hair pull the section of hair up to create volume and roll the curlers towards the scalp and towards you, making sure the curlers are straight otherwise this will cause a dip. Once enough heat is applied to the hair remove the curlers gently and apply two hair pins to keep the curls in place.

Once the front section is curled to about the temples, then curl the back section of hair using the same technique but curling the hair under using the hair curlers. The first curl should be situated on the crown and curled under. Due to creating curls on the crown the next section of hair will be split into two sections and creating two curls this is known as brick laying. Once you have created two curls due to the shape of the crown create one curl underneath carry this technique out until you have reached the neck.

Finally the in order to create curls using the side sections of hair which will spiral round the face, section the hair and carry out the same curling technique this time pointing the curlers towards the face, once heat has been applied to the hair slowly remove the curlers an secure in place using hair pins. Carry out this technique until the whole head I covered in set curls.

The photograph shows my first attempt at creating the hairstyle due to applying the curlers in the wrong direction my curls appeared slightly different. However I carried on with my first attempt to see what the hairstyle would look like in the end ad when I created other hairstyles such as the old maid


The next hairstyle which I created was the old maid hairstyle which was inspired by the Victorian era and also gothic horror. Once I had created all the set curls I firstly had to remove all the hair pins .Next I took the two side sections of hair and twisted the hair around the head, I then secured the twists in place using hair pins. Next I roll the bottom section of hair up and tucked the hair under securing it in place using hair pins.
Finally the top section of curls I backcombed slightly using my pin tail comb and situated the curls around the face create a pin tail curl effect I then secured the curls in place using hair pins.


I was generally quite happy with my first attempt at creating the old maid style hair, considering I curled the set curls in the wrong direction I think the hair style still works well.

Here is a photograph showing the side view of the old maid hairstyle. The photograph shows the sculpted curls at the side of the head which a secured in place using hair pins I feel this really relates to the Victorian era .

The next hair style week created was the sleek curls hair style. In order to create this look I had to firstly remove any hair pins from the previous hairstyle. Then using my paddle brush, brush the hair under and over using my hand as a tool t hold the hair in place.

I was generally quite happy with the outcome of this hairstyle considering I curled the set curls in the wrong directions, I feel the hairstyle still works and looks very sleek.

Finally the last hair style I created was the messy style curls, due to the hair being brushed out in the previous hairstyle I had to shake the hair in order to add volume to the hair and make the curls bounce back .
I found this hairstyle worked conveys an element o gothic horror and is easy to create.
 
In my own time I decided to have a second attempt at the Victorian hairstyles inspired by gothic horror, after making several mistakes when creating the set curls in my technical hair lesson I was able to see where I went wrong and correct the mistakes in my second attempt.
I was generally quite happy with the outcome of the set curls, I felt the hairstyle overall looked neater than my previous attempt, I also felt more confident with what I was doing during my second attempt and also felt the sectioning was a lot tidier.

Here is my second attempt at the Old maid hair style, I carried out exactly the same technique as my previous attempt however I felt due learning from my mistakes in my first attempt and curling the hair in the right direction the hairstyle overall looked a lot neater .

This is my second attempt at the sleek gothic hairstyle, I felt this one looked a lot more sleek and very different in comparison to my first attempt, this was due to learning from my mistakes when creating the set curls and curling them in the right direction in my second attempt, causing hairstyles which include this technique to have a much better finish.

This was my second attempt at the final hairstyle where the curls were shaken into place, although I curled the hair in the right direction in my second attempt which I didn't In my first I preferred the outcome of my first attempt I felt e hair had a lot more volume and due to the curls going the opposite way it also helped to give the hairstyle a gothic edge.

Sunday 22 March 2015

recreating a design style of makeup

recreating a designers style of makeup

In order to recreate Jean Paul Gaultier's style of makeup for a spring summer catwalk, I had to focus on making the eyes a Smokey colour with inky eyelids and extending the colour under the eyes. I was also giving a guideline of the inspiration to recreate the style of makeup which was the 1980s.

Equipment
kryolan foundation pallet
kryolan eye shadow pallet
kryolan glamour glow pallet
illamaqua neutral pallet
bowl of water
illamaqua loose powder
makeup brushes
sponge

Firstly I applied a foundation which match my partners skin tone to the face neck and ears using my foundation brush. I then blended the foundation into the skin and the hairline using my buffer brush.

Once the application looked even I then set the base with a loose illamaqua powder which I applied to the back of my hand and then rolled onto the face using a makeup sponge.

Next I focused on creating the Smokey eye look applying a dramatic brown from my kryolan eye shadow pallet from the eyelid right up to the brow.

I then highlighted the socket area of the eyes by using my blending brush and applying the dark brown from my illamaqua neutral pallet.

In order to bring out the eyes and also separate the colour browns I applied the white from my illamaqua neutral pallet underneath the brows and blended the colour also into the eyelid.

Using the black from my kryolan eye shadow pallet and some water I created an eyeliner which I first applied to the back of my hand and then applied to the outline of the eyelid to create the inky eye effect using a fine liner brush.

I then applied a brown from my kryolan pallet to underneath the eyes to extend the colour  little.

Using a photograph of Jen Paul Gaultiers makeup as a guideline, It was noticeable that extreme contouring of the convex areas of the face was used to complete his design, therefore I used a summer tan colour from my glamour glow pallet to bring out the convex areas of the face such as th cheekbones jawline and the temples. I then used a white from my glamour glow pallet to act as a highlighter which I applied to the lighter areas of the face.
Here I a photograph of the guideline which I used to recreate the Jean Paul Gaultier style of makeup

Here Is a photograph of my attempt at recreating Jean Paul Gaultiers style of makeup for a spring/summer fashion style of makeup.

I felt I interpreted Jean Paul Gaultiers style of makeup well with the contouring and the Smokey eyes. I feel I could have highlighted the brows more and applied a gloss to the lips to complete the look however.
 

Consultation notes

Name: Charlie
Aged: 18-19
Eye colour: blue
Skin tone : fair
Skin type: dry
Notes: fair skin and freckles
 

creating scars using moulds

creating scars using moulds

equipment
petrolease
moulds
gelatine/latex
prosade glue
baby powder
cotton buds
supracolour pallet
makeup brushes
wound filler
blood
puss optional
witch hazel
proclean oil
barrier cream
Vaseline
kryolan foundation pallet
paintbrush

health and safety
makeup sure the client is not allergic o any of the products prosthetic products in particular. If the client is allergic to the products or if the area of skin becomes red and itchy  remove immediately under cold running water.

technique
scars can be made from moulds by pouring gelatine or latex into the mould and being left to dry, once the mould is dry in order for it to come out easily adding a layer of prosade and also baby powder which will avoid the prosthetic from going tacky and sticking to other prosthetic pieces.

Firstly before applying the prosthetic to the skin apply a barrier cream to the area especially if the client has sensitive skin.

Next apply a layer of prosade glue to the area and to the back of the prosthetic and wait until the glue goes clear. Prosade is a moveable glue used to stick on all prosthetic pieces.

Once the glue has gone clear apply the prosthetic to the area applying plenty of pressure. If the glue is not clear the prosthetic pieces will slide and not stick to the skin.

when the prosthetic is firmly stuck down using witch hazel and a baby bud get rid of any rough edges blending the prosthetic into the skin.

when blending the prosthetic into the skin powder the prosthetic and use you mirror to judge how the prosthetic is looking along the way.

Next apply foundation to the prosthetic to make it blend into the skin and look more realistic.

then use wound filler to apply to the centre of the scar, wound filler can be applied either by using a spatula or a thin makeup brush.

Next apply colour such as reds yellows and blacks from your supracolour to the prosthetic using a fine line brush to make it seem more realistic.

Finally apply blood to the area or puss and also Vaseline which can e used to give a blister effect. In order to create a splattered blood effect use a stiff paintbrush .
Here is a photograph of the mould being applied and the rough edges being blended into the skin using witch hazel.
 
I felt my first attempt at applying the prosthetic to the skin was generally a good outcome, I felt I blended the edges of the prosthetic into the skin well.

Here is a photograph of my scar after the wound filler blood and supracolour had been applied, I was generally quite happy with the outcome.

In order to make the wound appear more severe I used an orange sponge which was quite a rough texture to spread and smudge the blood and supracolour around the around, I felt this completed the wound.

Consultation notes

client 1:
Name :Kerry
Age : 22
Skin type: dry
Skin tone: fair (alabaster foundation kryolan)
Eye colour: greyish blue
Notes: fair skin tone and freckles


Tuesday 17 March 2015

scratches and black eyes

scratches and black eyes

lesson summary: how to create scratches and a black eyes

Black eyes and bruises


equipment
makeup brushes
supracolour pallet
foundation
vaseline

Health and safety
make sure the client is not allergic to nay of the products if the clients skin becomes red or itchy in the area where the product has been applied remove immediately and run under cold running water.

Technique :
when creating a black eye or a bruise  it is a good idea to use an image of bruising as a guideline to analyse the colour.
Firstly apply foundation around the  area or the eye and onto the face and blend out using a buffer brush.
Next apply several colours such as reds blacks purples blues and yellows to the area and blend out using a blending brush.
If you are creating a bruise which is red and slightly swollen apply a small amount of Vaseline to the area to make the bruising appear more sore.

I wasn't too happy with my attempt at creating a black eye even though I used an image of a real black eye as a guideline, I feel in order to make the black eye appear more effective I should have layered the supracolour up and blended the colours more.

In order to recreate the bruise I watched a step by step tutorial to refresh my memory, I feel my first attempt wasn't bad the bruise looks old and faint I feel in order to make the bruise appear more effective I should have carried on layering up the supracolour.


scratches

equipment
fine line brush
supracolour pallet
blending brush

technique
Firstly I created a fine line with a fine makeup brush and a light red from my  supracolour pallet.
Next I used my blending brush to blend the line out into the skin.
The I applied a darker layer of red over top of the faded line and blended the line out with the blending brush.
finally  I started to create broken lines with my fine line brush and dark red mixed with a small amount of black.
In order to make the scratch appear more realistic I had to really blend the product into the skin and keep layering up the supracolour.

I was generally happy with the outcome of my first attempt at creating a scratch I felt the scratch was blended well into the skin and looked realistic.


Consultation notes


Client 3
Name: Heidi (myself)
Age: 20
Skin type: dry
Skin tone: olive
Eye Colour : Brown
Notes: Olive skin tone / olive kryolan foundation base


dry flakeykin sweat, fever, rashes and illness

How to create dry flakily skin sweat fever rashes and illness

 stippled skin:

equipment:

Duo/old age stipple
foundation pallet
foundation brush
supracolour pallet
makeup brushes
hairdryer
barrier cream

Health and safety
Make sure the client is not allergic to any of the products I the area becomes red or itchy due to unknown allergies remove immediately using cold running water.

Duo contains latex therefore make sure the client has no allergies to latex.


test the latex on a small area of skin using a cotton swab before applying to larger areas f the area becomes red and itchy remove immediately using cool running water.

technique:
 firstly apply a barrier cream to the area before applying the latex to the skin, especially if the client has sensitive skin this will avoid any redness.
then apply old age stipple to the skin  or duo glue, feathering the product into the face using a sponge making sure there are no hard edges.
next apply the hairdryer at a cool temperature to dry the area stretching the skin .
apply several layers of the old age stipple or duo to the area and dry with the hairdryer at a cool temperature.
then apply foundation to lift the stipple or do to create and old age stipple effect.
make sure the product is blended well into the skin and the hairline as well as the ears and the neck.
if the skin is stretched tight wrinkles will occur.
Finally using the supracolour pallet applied a subtle amount of red to the area in order for the old age stipple to appear sore.

Due to having no old age stipple in my kit and a short period of time to create many different special effects techniques in an hour lesson, I had an attempt at creating old age stipple in my own time using latex instead of the stipple red supracolour and my kryolan foundation pallet. Due to not having the old age stipple to create my look as a result I wasn't too happy with the outcome.
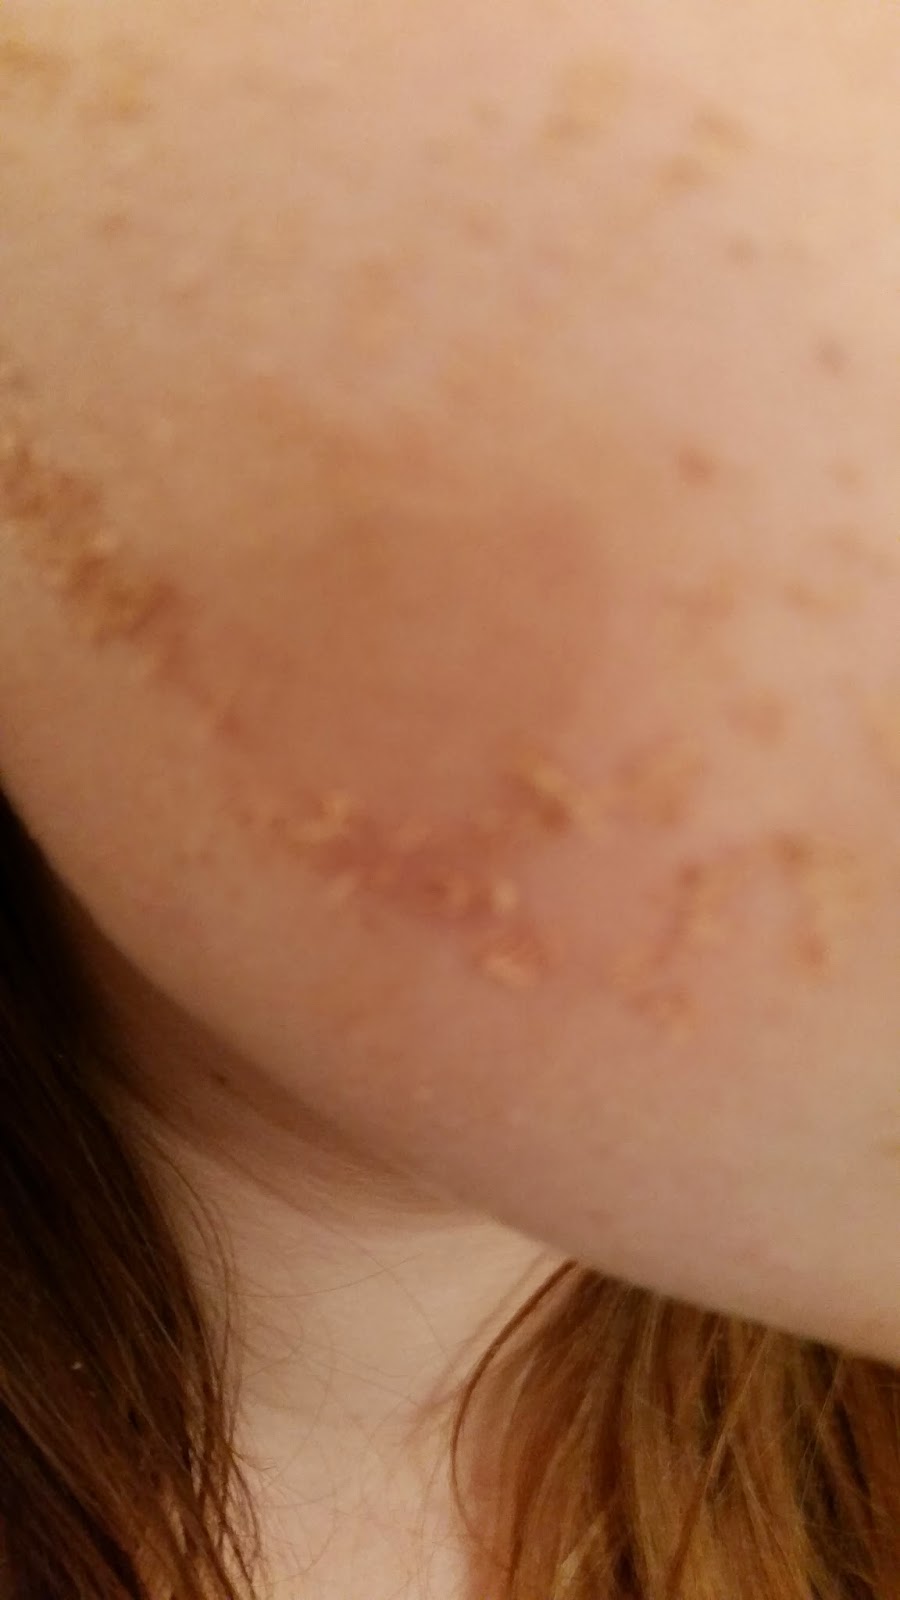
Dry flaky skin

equipment:
foundation
makeup brushes
sponge
supracolour
duo
hairdryer

technique:
paint on foundation  making sure the product is thick, don't apply powder.
next using a black sponge which is a slightly rough material braze it against the foundation to create a flaky skin effect.
apply duo to the area and let it go tacky by drying slightly using a hairdryer on a cool heat.
Finally the duo will start to peel and appear as flaky like skin.

I felt my attempt at dry flaky skin was a good attempt however in order for the makeup to look more effective I feel I could have applied a thicker layer of foundation to the area.


Illness

equipment
supracolour pallet
foundation pallet
makeup brushes
water spray bottle
Vaseline
illamasqua loose powder
tear stick
technique

firstly apply a light coloured foundation to the face neck an ears and blend out into the hairline.


next apply a small amount of white and yellow supracolour mixed together to the face ears and neck.

next mix together a blue and yellow to create a brown apply the colour to the back of your hand first and then apply the colour under the eyes .

Apply the tear stick underneath the eyes in order to make them appear watery.

then stipple colour such as reds rom the supracolour pallet into the face .

apply a powder to make the skin appear more dry

Finally apply a small amount of Vaseline to the face in order to make the skin appear more sore.

sweat can be created also by spraying water around the hairline.

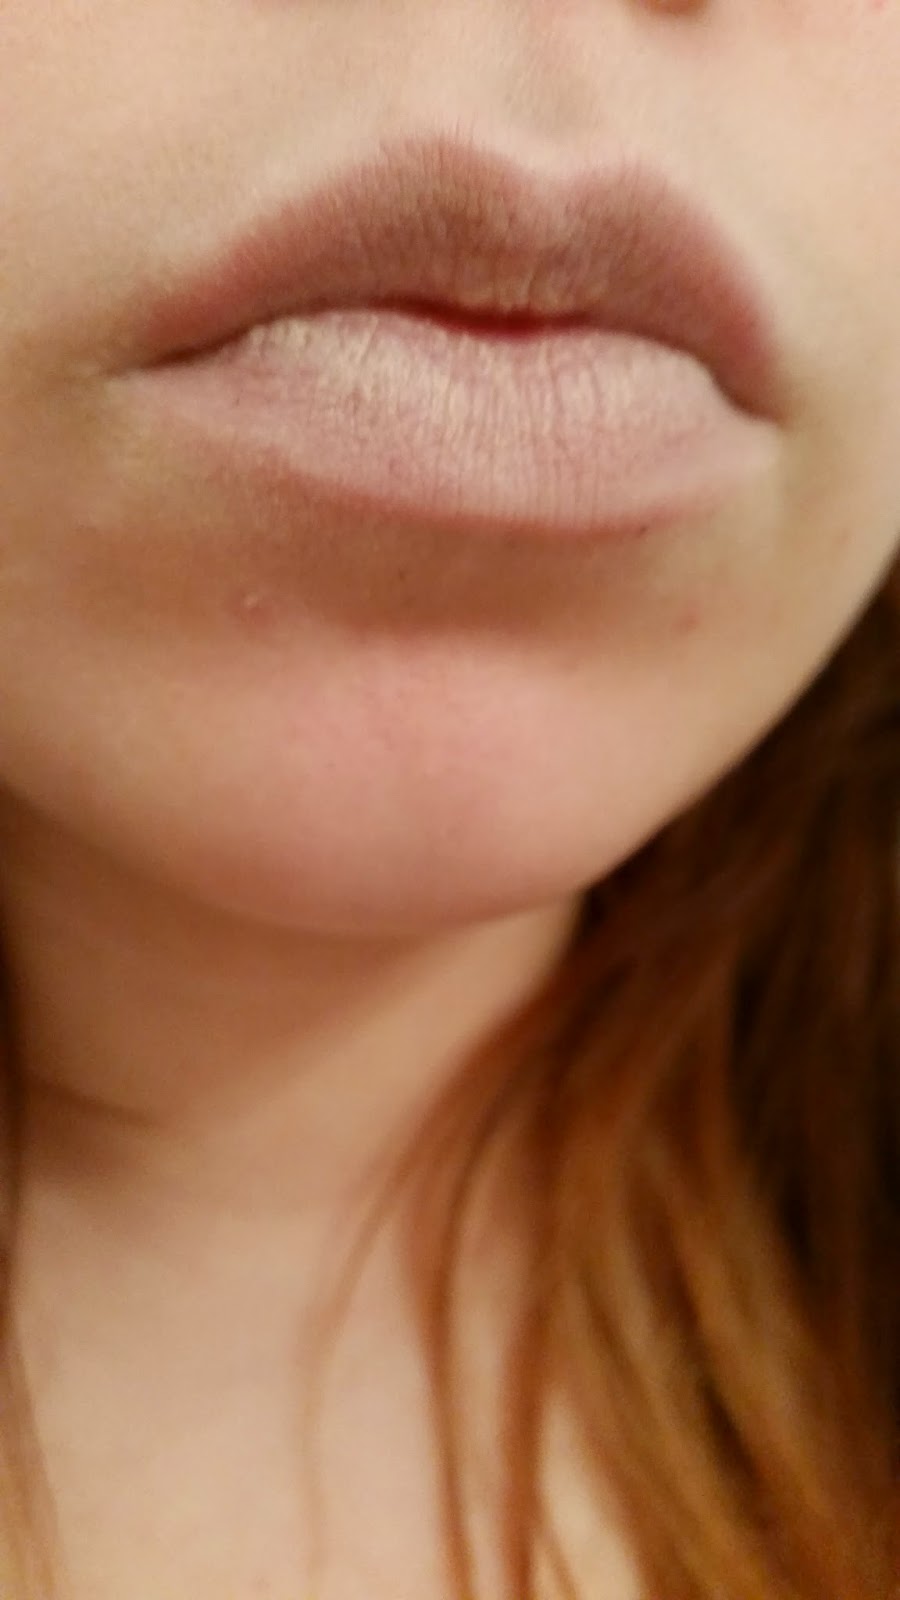
create dry lips by apply foundation to the lips and piercing them together.
Due to having a short amount of time to learn all the special effects techniques I had to create majority of my looks in my own time, I felt my first attempt at creating illness was quite good however I feel I could have made the skin paler by applying lighter foundation and exaggerating the brown under the eyes more.

Rashes or freckles

equipment:
icaporfal alchol
stiff brush
supracolour pallet

firstly mix a red from the supracolour pallet and icaporfal alchol together .
then make sure the client closes their eyes before applying to the skin .
then using a stiff brush flick the red supracolour and alchol at the area to create a rash.

I felt my attempt at creating a rash  which I created in my own time was quite good considering I didn't have any icaporfal alcohol in my kit as a replacement I used a small amount of water which I mixed with my supracolour. The makeup looked more effective than it does in the photograph also.
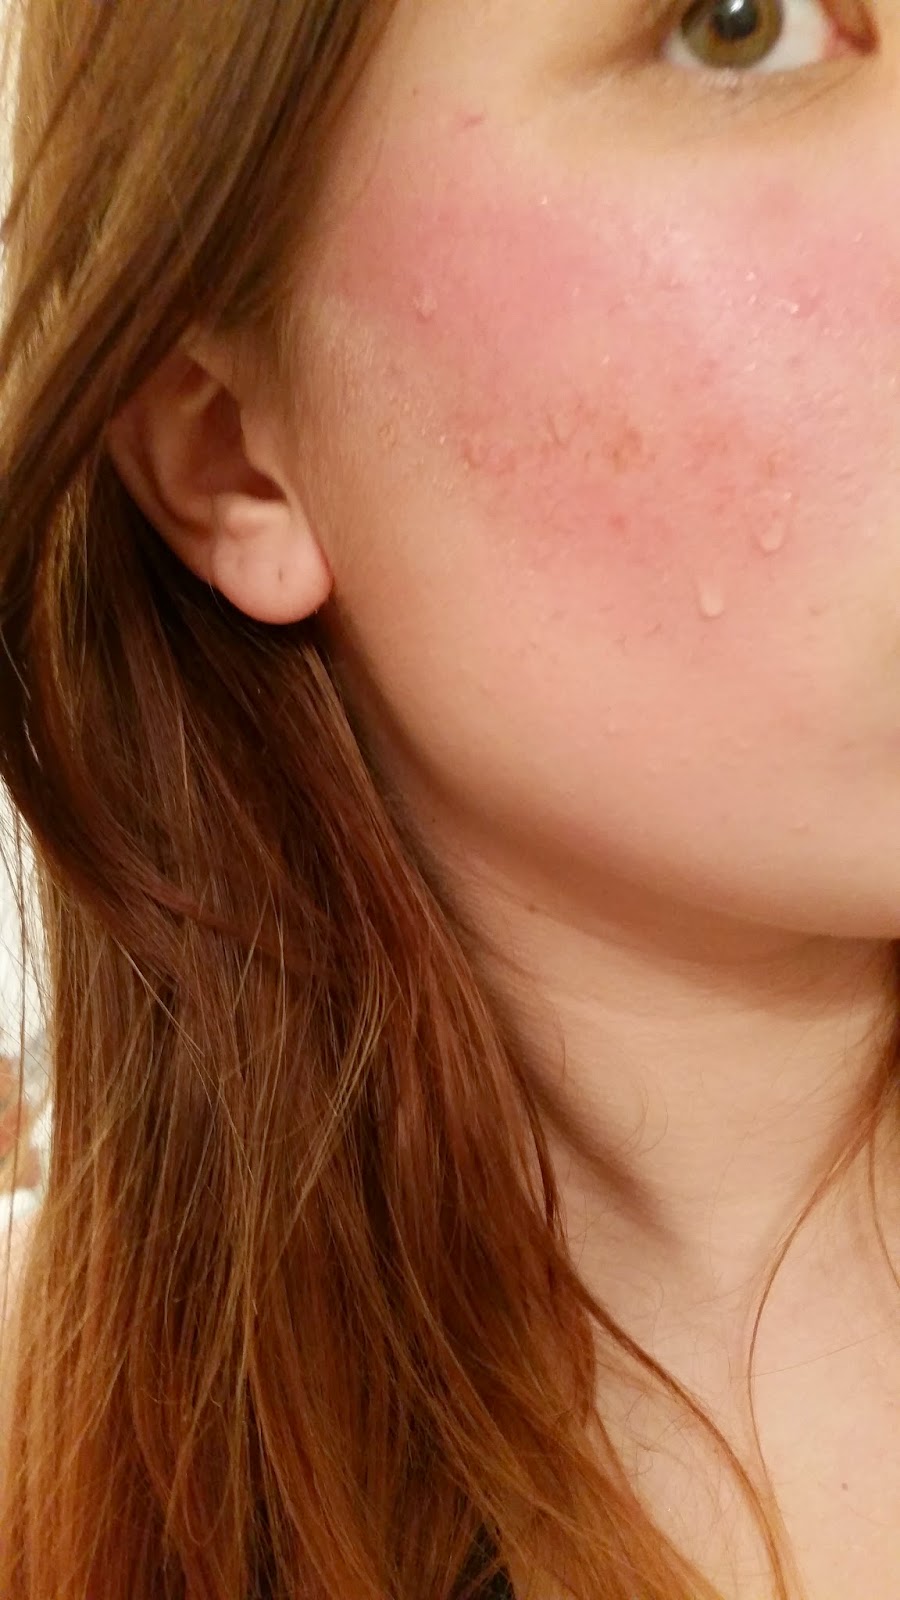
 

Fever


equipment
supracolour pallet
makeup brushes
sponge
water spay

technique

create mottled skin firstly by applying red supracolour to the skin , blend the colour into the face to make the client appear hot and feverish.
do not apply any powder to the face this will dry the skin out the idea is for the skin to appear shiny
apply water spray around the hairline to create sweat.
apply water spray to an area of skin which has red supraclour applied in order to create broken veins .

I was very happy with the outcome of my fever makeup I felt by applying water to the stippled supracolour helped to create broken veins and make the skin appear hot.

Dirty hands

equipment

fullers earth
water
coloured test spray
moisturizer

by applying fullers earth to an area of skin this will create a dusty effect.
by adding water to fullers earth this will create mud.
A coloured test spray can also be used to create dirty hands.

firstly make sure the client bends knuckles to any stripes or patches and apply the product
then part the fingers and apply the product
next rub moisturizer into the palms an on the hands
carry on applying the product to the hands in order to build up layers of dirt.
This is my attempt at creating dirty hands, due to not having any fullers earth I decided to use a brown coloured dry shampoo which I then applied water to in order for it to appear as dirt, making sure there was no patches of skin missed particularly in between my fingers or on the palm of my hand.

I was generally quite happy with the outcome of my dirty hands attempt although I didn't have the original product I felt the dry shampoo was a good alternative.

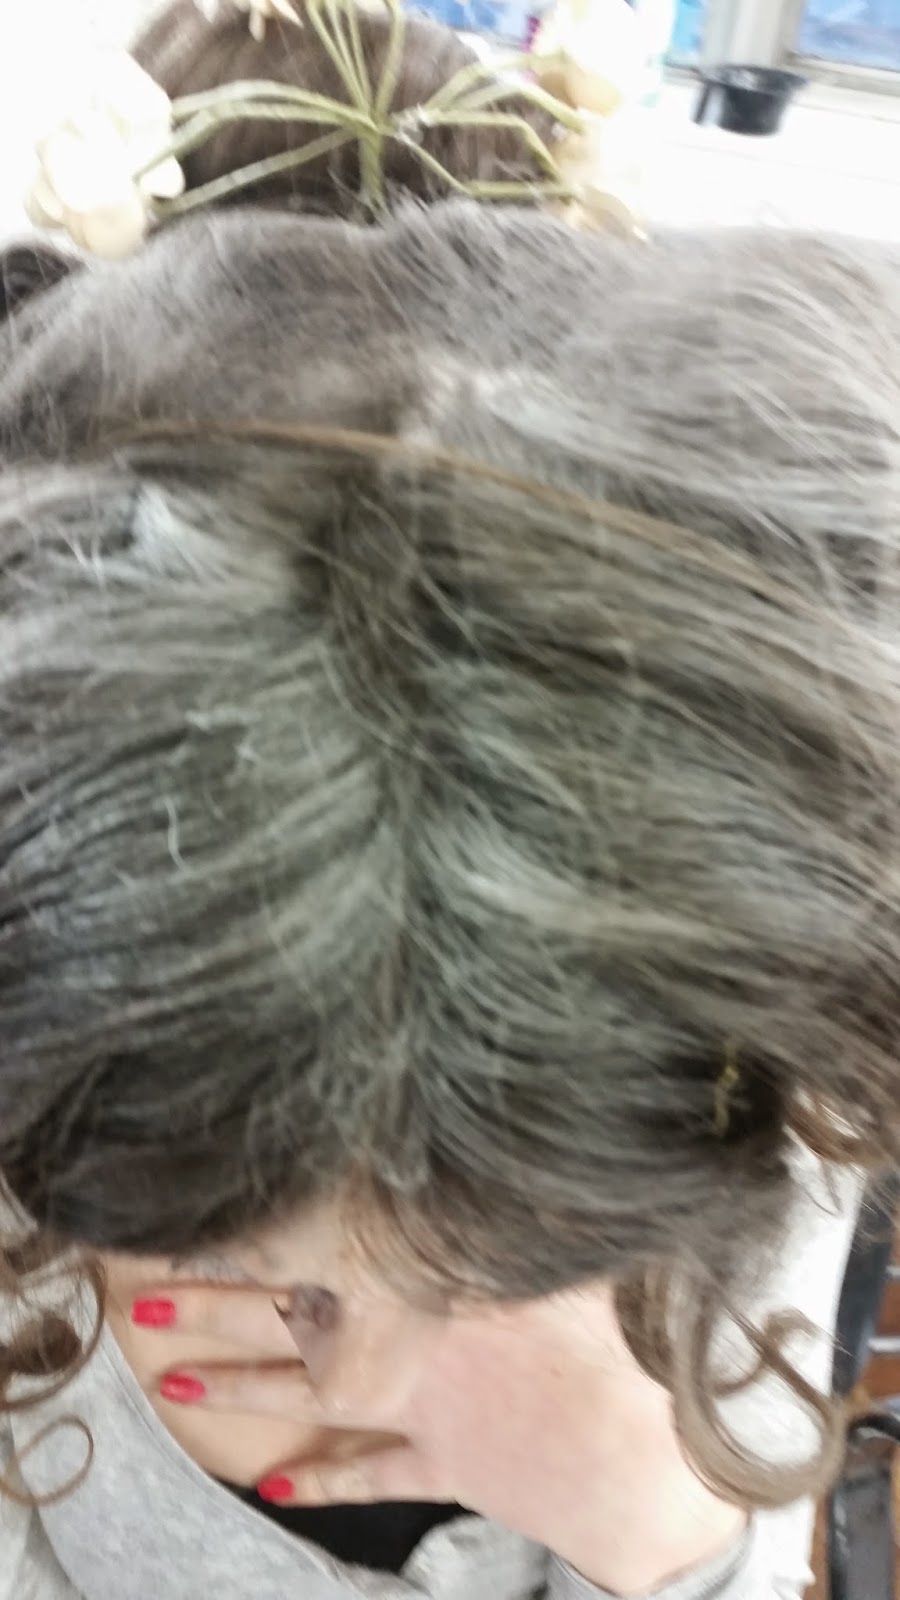
Dirty hair/ age the hair


equipment
Bryll cream
Vaseline
dry shampoo/talc powder
fuller earth
hairbrush

In order to make the hair dusty apply fuller earth throughout the hair. By applying water to the fuller earth mud can be created, by applying this to the hair this will make the hair appear dirty.

In order to make the hair appear greasy use a product that contains a lot of oil such as bryll cream or even vasline and apply the product to mainly the roots and brush slightly through the hair .

In order to make the hair appear aged a powdered product such as dry shampoo or even talc powder can be used. Spray the dry shampoo into the hair and brush slightly through the hair .

I felt my attempt at aging the hair was generally quite good I brushed the dry shampoo evenly through the roots in order for the hair to appear aged, this I felt worked well.


Consultation notes

client 1:
Name :Kerry
Age : 22
Skin type: dry
Skin tone: fair (alabaster foundation kryolan)
Hair colour: Brown
Hair length : long
Eye colour: greyish blue
Notes: fair skin tone and freckles


Client 3
Name: Heidi (myself)
Age: 20
Skin type: dry
Skin tone: olive
Eye Colour : Brown
Notes: Olive skin tone / olive kryolan foundation base


Monday 16 March 2015

creating an Estella image

Estella hair and makeup

When creating my own interpretation of Estella for an informal assessment, I wanted to the makeup to be quite natural in order for it to be periodically correct. During the assessment I used a face chart which I created with a list of products down the side and a hair sketch with the different techniques incorporated into my design to use as a guideline.

Makeup

equipment:
Kryolan foundation pallet
kryolan lip pallet
kryolan eye shadow pallet
mascara
mascara wand
makeup brushes
glamour glow pallet

Firstly I applied a light alabaster foundation to the face ears and neck  mixed with an illamasqua primer and then blended out the product with my buffer brush.
next I applied a summer tan colour  from my glamour glow pallet by kryolan subtly to the convex areas of the face.
The I applied highlighter to the lighter areas oft he face from my glamour glow pallet, the product used was called blush mauve.

next I applied a light pink natural colour fro my lip pallet from kryolan in order to add colour to the lips.
Then using the caraway colour  which is a grey shade ,from my kryolan eye shadow pallet I highlighted the socket areas of the eyes.
Then with the white from my kryolan eye shadow pallet I applied colour to the eye lids.
Finally to bring out the eyes slightly I applied a small amount of mascara.

I was generally quite happy with the outcome of my Estella makeup although it appears quite plain and simple I feel it captures the Victorian look and is natural which I wanted to achieve.


Hair

equipment
feather
flowers
hair pins
hair tie
pin tail comb
curlers
hair brush

Firstly I created a centre parting with my pin tail comb.
Then I sectioned the hair into two small sections at the front of the hair and one large section with the remaining hair.
With the larger section of hair I then secured the hair into a high ponytail.
I then sectioned the ponytail with my pin tail comb  into four prominent sections .
The first sections I created a plait which will be situated around the bun
Then with the remaining three sections I applied hairspray to each section then rolled the hair and secured in place with several hair pin to create a Victorian style bun.
Next I situated the plaited section of hair around the bun.
I then curled the front two sections of hair with the curlers and situated the curls around the bun.
Due to my partner having a fringe which was slightly grown out I used the shorter sections of hair to create the same amount of sculpted ringlets on either side which I applied hairspray to  avoid them from dropping.
Finally I added decoration to the hairstyle situating the feathers and the flowers around the bun.

Overall I  was quite happy with the outcome of my Estella design after getting advise from Helen on how to style the hair with out making the design look messy. I felt I sectioned the hair well and had time management throughout the assessment.

Consultation notes

client 1:
Name :Kerry
Age : 22
Skin type: dry
Skin tone: fair (alabaster foundation kryolan)
Eye colour: greyish blue
Hair colour: Brown
Hair length: Long
Notes: fair skin tone and freckles

Sunday 15 March 2015

Miss havisham and estella face charts and hair sketches


 face charts and hair sketches

Estella

For my informal Estella assessment I created a face chart with a list of products i used to create the look on the left hand side and a hair sketch with the different techniques incorporated into my final design.
equipment:
lip pallet
glamour glow pallet
kryolan eyeshadow pallet
foundation pallet
makeup brushes
 
The face chart I created for the Estella look i want to be quite natural .
A light foundation would be firstly applied to the face due to Victorians having a fair complexion.
A summer tan will then be subtly applied to the convex areas of the face.
Blush mauve from the glamour glow pallet is then applied to the face to act as a highlighter.
Dc001 from the lip pallet which is a neutral pink colour is then applied to the lips.
And finally caraway from the kryolan eye shadow pallet will be applied to the socket area of the eyes and a white will be applied to the eyelids
 
I was generally quite happy with the outcome of my Estella face chart although it appears quite plain, I feel I have achieved the natural look as well as the Victorian style of makeup.

This was my first idea for my Estella design, the sketch shows the hair sectioned into two the top section styled as a plaited bun and the remaining section of hair styled into ringlets, however I wasn't too keen on my first idea.

My second idea for my Estella assessment was the Apollo knot which shows the hair sectioned into a centre parting. The hair sectioned into three the larger section styled into a rolled style bun and he two small sections styled into ringlets .
 

Miss Havisham


For my Miss Havisham assessment i wanted to create a design which would be simple to recreate, therefore my sketch conveys the 1830s Victorian techniques with the Victorian bun centre parting and the ringlets situated around the face. I created this sketch to use as a guideline in my assessment,

equipment
gelatine
supracolour pallet
camouflage pallet
kryolan eyeshadow pallet
makeup brushes
foundation pallet
 
For my Miss Havisham assessment I created a face chart with the list of products needed along the left hand side of the face chart.
The face chart also shows a burn situated along the forehead however I decided not to incorporate this into my final design but made a note of this on my face chart for the examiner to see.
 
Firstly a foundation from my kryolan pallet which matches the clients skin will be applied to the face.
Next using the camouflage pallet and a brown and grey from my kryolan eye shadow pallet I highlighted any visible lines on the face.
 
Next i applied a cream colour from the camouflage pallet to the lips to make them appear more aged.
 
I then applied a brown from the kryolan pallet to the eyes.
 
I the applied a subtle pink from the kryolan eye shadow pallet to the cheeks.
 
I then applied white and yellow supracolour to the lashes and brows.
 
I then applied to left side of the face gelatine which i pointed the brush downwards in order to create a drip effect, i created an easy pattern for the drips which could be recreated in my continuity assessment.
 
Once the gelatine was dry and layer up onto the face i applied a loose illamaqua powder and another layer of the foundation.
 
Finally i mirrored the visible lines and the style of makeup on the right side of the face overtop of the gelatine.
 
In order to create the burn on my face chart i applied gelatine to the area which i left to go tacky then applied reds blacks and yellow from my supracolour pallet

equipment
glamour glow pallet
supracolour pallet
camouflage pallet
eggshells
red eyeliner pencil
makeup brushes
eye shadow pallet
.
Here is another idea which i created for my Miss Havisham look.
Firstly i applied a summer tan from my glamour glow pallet to the convex areas of the face, i also made the cheekbones appear slightly sunken in.
In then applied a neutral beige from my camouflage pallet to the lips.
I then applied a grey to the eyelids and a red eye pencil around the eyes.
Using a white and yellow from my supracolour pallet i highlighted the brows and eyelashes.
Finally in order to make Miss Havisham convey that cracks are appearing by displaying cracks on her face i used broken up eggshells which i used duo to stick the egg shell to the face.
I finally applied foundation over the eggshell and used my lip brush and black suprcolour to draw around the eggshells and create extended lines.
 
When trying this look on the face i felt it worked well however didn't work well on the face chart due to the significant difference in colour.

equipment
kryolan eye shadow pallet black ad grey
makeup brushes
 
Next i attempted to created a face chart which appeared slightly aged. I used the black and grey from my kryolan eye shadow pallet to add colour to the eyes and lips and to highlight the face and add shadow to the convex area of the face.
 
I liked the outcome of my Miss Havisham face chart however I felt it appeared a little too theatrical rather than Victorian .

equipment
camouflage pallet
kryolan eye shadow pallet
supracolour pallet
makeup brushes
Using the dark brown and caraway from my kryolan eye shadow pallet i had another attempt at an aged makeup o a face chart, i used the brows to add shadow and to the convey areas of the face and to bring out the wrinkles on the face, i also applied the dark brown to the eyelids.
Next i applied a neutral colour from my camouflage pallet to the lips.
Finally i used the white and yellow from my supracolour pallet to the create the eyelashes and eyebrows.
 
I was generally quite happy with the outcome of my aged Miss Havisham face chart, I liked the shading I incorporated into the look however I wanted to include some sort of special effect into my final design In order to avoid my look from appearing simple.


Victorian hair estella and miss havisham


Victorian hair Estella and Miss Havisham

Estella

equipment:
curlers
hairbrush
hairpins
pin tail comb
hair ties
mousse
hairspray
sectioning clips
Firstly I created a centre parting using my pin tail comb .
I then applied mousse to the parting in order to make the centre parting more prominent and neat.
Next i sectioned the hair into three two small sections at the front of the hair and a larger section at the back using my pin tail comb and sectioning clips.
The larger section i then secured into a high ponytail with a hair tie.
I then applied hairspray to the ponytail to make sure any loose ends were in place and to make the hair appear more sleek.
I then separated the sections in the ponytail into four sections.
One of the four sections i created a plait.
The three remaining sections i applied hairspray to  and rolled the hair to create a Victorian style bun which i then secured in place using hairpins.
I then situated the plaited section around the bun.
The two smaller sections at the front of the hair i curled and hair pin around the bun.
Finally the shorter pieces of hair i create the same amount of ringlets on either side of the hair which i sprayed with hairspray to avoid them from dropping.
 

Here is another photograph of the Estella hair from a side view.
I was generally quite happy with the outcome of the design i felt it look neat and conveyed a variety of Victorian techniques incorporated into the design.

This was my first attempt at my Estella look, i felt it was a good attempt but could have looked less messy. After speaking to Helen she explained that the sectioning could have been neat in order to make the design appear more tidy, this was something to take on board when recreating the look in my informal assessment.

Firstly i create a centre parting with my pin tail comb,
Then created three sections tw smaller sections and a larger section with the remaining hair.
next i secured the larger section in a ponytail
i then sectioned the hair into four and plaited one of the section.
then i applied hairspray to three sections and rolled the hair and secured each section in place with hair pins to create a Victorian style bun.
the i situated the plait around the bun.
i then curled the two sections of hair and secured the curls around the bun.
the two shorter sections of hair i curled and create sculpted ringlets which i applied hairspray to avoid them from dropping.
finally i applied decoration to the hair securing the feather and flowers around the bun.
 

Miss Havisham

equipment
dry shampoo
hair pins
hair curlers
flowers
pin tail com
sectioning clips
hair ties

Here is a photograph of final design from my second continuity assessment.
 
Firstly for my miss Havisham look i create a messy centre parting.
then i sectioned the hair into three two smaller sections and one large section.
next i secured the hair in a ponytail and sectioned each piece of hair applied hairspray to the section and rolled the hair to create a bun which i secured in place using hair pins.
Next i applied dry shampoo to the bun.
I then situated artificial flowers above the bun.
Next i sectioned the smaller sections into three each side of the head which i then rolled the hair and secured in place with hair pins.
The to roll on either side of the hair i applied the curlers to and created a sculpted ringlet on either side.
Finally i applied dry shampoo to the front of the hair.

Here is another photograph of my final hair design from my first continuity assessment.
 

Consultation notes

name: Kerry
Age: 22
Hair colour: Brown
Hair length: Long
Notes: N/A