Monday, 16 March 2015

creating an Estella image

Estella hair and makeup

When creating my own interpretation of Estella for an informal assessment, I wanted to the makeup to be quite natural in order for it to be periodically correct. During the assessment I used a face chart which I created with a list of products down the side and a hair sketch with the different techniques incorporated into my design to use as a guideline.

Makeup

equipment:
Kryolan foundation pallet
kryolan lip pallet
kryolan eye shadow pallet
mascara
mascara wand
makeup brushes
glamour glow pallet

Firstly I applied a light alabaster foundation to the face ears and neck  mixed with an illamasqua primer and then blended out the product with my buffer brush.
next I applied a summer tan colour  from my glamour glow pallet by kryolan subtly to the convex areas of the face.
The I applied highlighter to the lighter areas oft he face from my glamour glow pallet, the product used was called blush mauve.

next I applied a light pink natural colour fro my lip pallet from kryolan in order to add colour to the lips.
Then using the caraway colour  which is a grey shade ,from my kryolan eye shadow pallet I highlighted the socket areas of the eyes.
Then with the white from my kryolan eye shadow pallet I applied colour to the eye lids.
Finally to bring out the eyes slightly I applied a small amount of mascara.

I was generally quite happy with the outcome of my Estella makeup although it appears quite plain and simple I feel it captures the Victorian look and is natural which I wanted to achieve.


Hair

equipment
feather
flowers
hair pins
hair tie
pin tail comb
curlers
hair brush

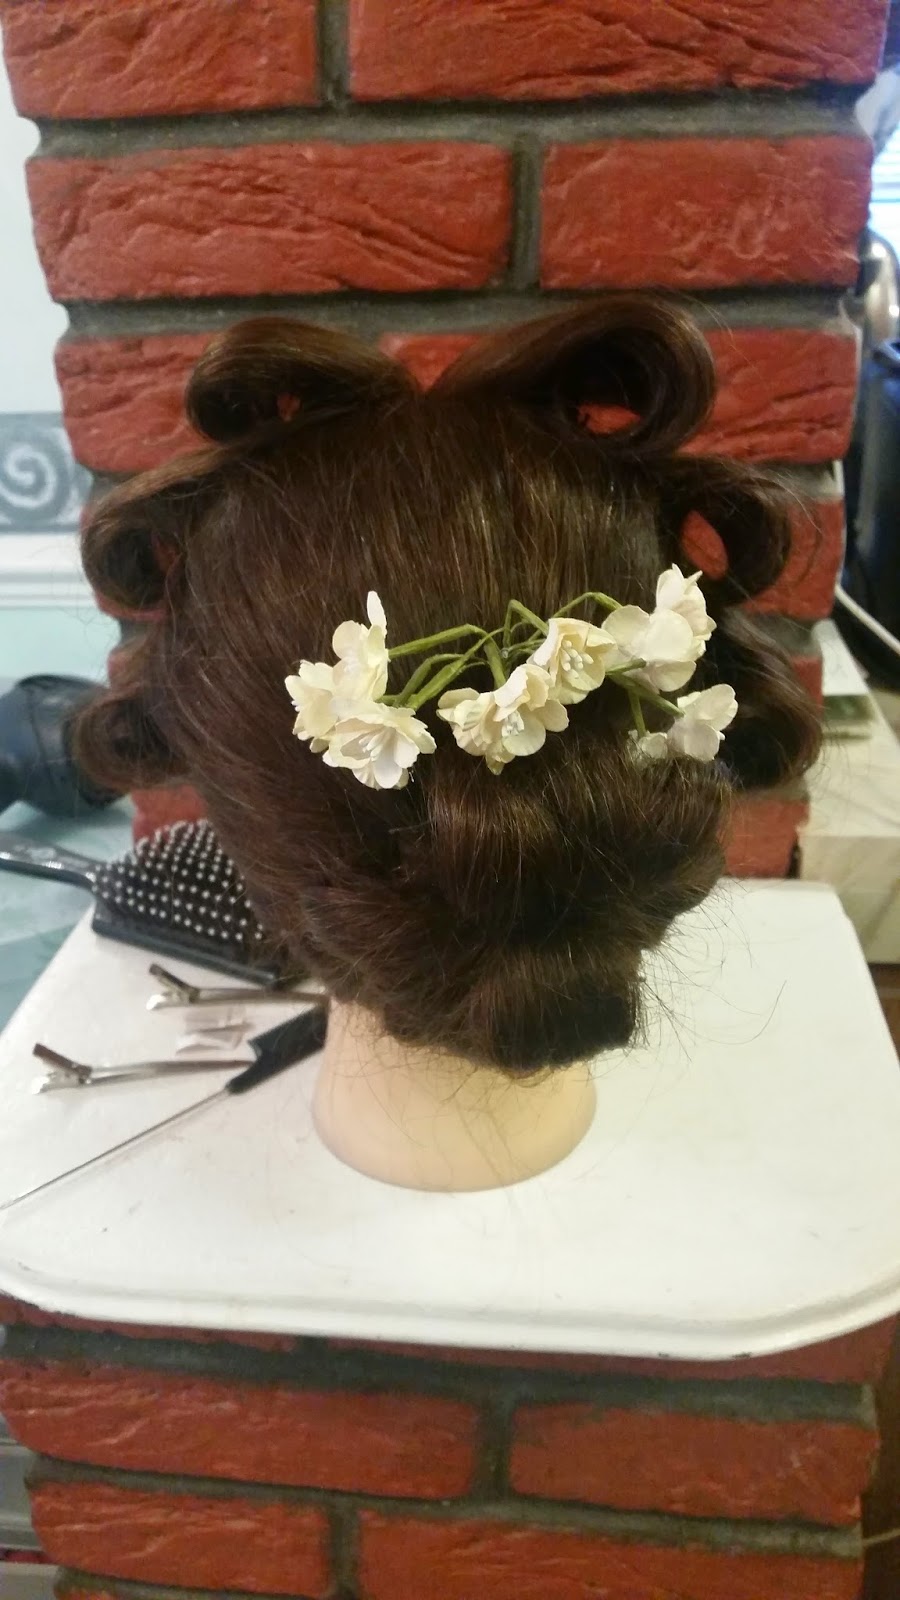
Firstly I created a centre parting with my pin tail comb.
Then I sectioned the hair into two small sections at the front of the hair and one large section with the remaining hair.
With the larger section of hair I then secured the hair into a high ponytail.
I then sectioned the ponytail with my pin tail comb  into four prominent sections .
The first sections I created a plait which will be situated around the bun
Then with the remaining three sections I applied hairspray to each section then rolled the hair and secured in place with several hair pin to create a Victorian style bun.
Next I situated the plaited section of hair around the bun.
I then curled the front two sections of hair with the curlers and situated the curls around the bun.
Due to my partner having a fringe which was slightly grown out I used the shorter sections of hair to create the same amount of sculpted ringlets on either side which I applied hairspray to  avoid them from dropping.
Finally I added decoration to the hairstyle situating the feathers and the flowers around the bun.

Overall I  was quite happy with the outcome of my Estella design after getting advise from Helen on how to style the hair with out making the design look messy. I felt I sectioned the hair well and had time management throughout the assessment.

Consultation notes

client 1:
Name :Kerry
Age : 22
Skin type: dry
Skin tone: fair (alabaster foundation kryolan)
Eye colour: greyish blue
Hair colour: Brown
Hair length: Long
Notes: fair skin tone and freckles

Sunday, 15 March 2015

Miss havisham and estella face charts and hair sketches


 face charts and hair sketches

Estella

For my informal Estella assessment I created a face chart with a list of products i used to create the look on the left hand side and a hair sketch with the different techniques incorporated into my final design.
equipment:
lip pallet
glamour glow pallet
kryolan eyeshadow pallet
foundation pallet
makeup brushes
 
The face chart I created for the Estella look i want to be quite natural .
A light foundation would be firstly applied to the face due to Victorians having a fair complexion.
A summer tan will then be subtly applied to the convex areas of the face.
Blush mauve from the glamour glow pallet is then applied to the face to act as a highlighter.
Dc001 from the lip pallet which is a neutral pink colour is then applied to the lips.
And finally caraway from the kryolan eye shadow pallet will be applied to the socket area of the eyes and a white will be applied to the eyelids
 
I was generally quite happy with the outcome of my Estella face chart although it appears quite plain, I feel I have achieved the natural look as well as the Victorian style of makeup.

This was my first idea for my Estella design, the sketch shows the hair sectioned into two the top section styled as a plaited bun and the remaining section of hair styled into ringlets, however I wasn't too keen on my first idea.

My second idea for my Estella assessment was the Apollo knot which shows the hair sectioned into a centre parting. The hair sectioned into three the larger section styled into a rolled style bun and he two small sections styled into ringlets .
 

Miss Havisham


For my Miss Havisham assessment i wanted to create a design which would be simple to recreate, therefore my sketch conveys the 1830s Victorian techniques with the Victorian bun centre parting and the ringlets situated around the face. I created this sketch to use as a guideline in my assessment,

equipment
gelatine
supracolour pallet
camouflage pallet
kryolan eyeshadow pallet
makeup brushes
foundation pallet
 
For my Miss Havisham assessment I created a face chart with the list of products needed along the left hand side of the face chart.
The face chart also shows a burn situated along the forehead however I decided not to incorporate this into my final design but made a note of this on my face chart for the examiner to see.
 
Firstly a foundation from my kryolan pallet which matches the clients skin will be applied to the face.
Next using the camouflage pallet and a brown and grey from my kryolan eye shadow pallet I highlighted any visible lines on the face.
 
Next i applied a cream colour from the camouflage pallet to the lips to make them appear more aged.
 
I then applied a brown from the kryolan pallet to the eyes.
 
I the applied a subtle pink from the kryolan eye shadow pallet to the cheeks.
 
I then applied white and yellow supracolour to the lashes and brows.
 
I then applied to left side of the face gelatine which i pointed the brush downwards in order to create a drip effect, i created an easy pattern for the drips which could be recreated in my continuity assessment.
 
Once the gelatine was dry and layer up onto the face i applied a loose illamaqua powder and another layer of the foundation.
 
Finally i mirrored the visible lines and the style of makeup on the right side of the face overtop of the gelatine.
 
In order to create the burn on my face chart i applied gelatine to the area which i left to go tacky then applied reds blacks and yellow from my supracolour pallet

equipment
glamour glow pallet
supracolour pallet
camouflage pallet
eggshells
red eyeliner pencil
makeup brushes
eye shadow pallet
.
Here is another idea which i created for my Miss Havisham look.
Firstly i applied a summer tan from my glamour glow pallet to the convex areas of the face, i also made the cheekbones appear slightly sunken in.
In then applied a neutral beige from my camouflage pallet to the lips.
I then applied a grey to the eyelids and a red eye pencil around the eyes.
Using a white and yellow from my supracolour pallet i highlighted the brows and eyelashes.
Finally in order to make Miss Havisham convey that cracks are appearing by displaying cracks on her face i used broken up eggshells which i used duo to stick the egg shell to the face.
I finally applied foundation over the eggshell and used my lip brush and black suprcolour to draw around the eggshells and create extended lines.
 
When trying this look on the face i felt it worked well however didn't work well on the face chart due to the significant difference in colour.

equipment
kryolan eye shadow pallet black ad grey
makeup brushes
 
Next i attempted to created a face chart which appeared slightly aged. I used the black and grey from my kryolan eye shadow pallet to add colour to the eyes and lips and to highlight the face and add shadow to the convex area of the face.
 
I liked the outcome of my Miss Havisham face chart however I felt it appeared a little too theatrical rather than Victorian .

equipment
camouflage pallet
kryolan eye shadow pallet
supracolour pallet
makeup brushes
Using the dark brown and caraway from my kryolan eye shadow pallet i had another attempt at an aged makeup o a face chart, i used the brows to add shadow and to the convey areas of the face and to bring out the wrinkles on the face, i also applied the dark brown to the eyelids.
Next i applied a neutral colour from my camouflage pallet to the lips.
Finally i used the white and yellow from my supracolour pallet to the create the eyelashes and eyebrows.
 
I was generally quite happy with the outcome of my aged Miss Havisham face chart, I liked the shading I incorporated into the look however I wanted to include some sort of special effect into my final design In order to avoid my look from appearing simple.


Victorian hair estella and miss havisham


Victorian hair Estella and Miss Havisham

Estella

equipment:
curlers
hairbrush
hairpins
pin tail comb
hair ties
mousse
hairspray
sectioning clips
Firstly I created a centre parting using my pin tail comb .
I then applied mousse to the parting in order to make the centre parting more prominent and neat.
Next i sectioned the hair into three two small sections at the front of the hair and a larger section at the back using my pin tail comb and sectioning clips.
The larger section i then secured into a high ponytail with a hair tie.
I then applied hairspray to the ponytail to make sure any loose ends were in place and to make the hair appear more sleek.
I then separated the sections in the ponytail into four sections.
One of the four sections i created a plait.
The three remaining sections i applied hairspray to  and rolled the hair to create a Victorian style bun which i then secured in place using hairpins.
I then situated the plaited section around the bun.
The two smaller sections at the front of the hair i curled and hair pin around the bun.
Finally the shorter pieces of hair i create the same amount of ringlets on either side of the hair which i sprayed with hairspray to avoid them from dropping.
 

Here is another photograph of the Estella hair from a side view.
I was generally quite happy with the outcome of the design i felt it look neat and conveyed a variety of Victorian techniques incorporated into the design.

This was my first attempt at my Estella look, i felt it was a good attempt but could have looked less messy. After speaking to Helen she explained that the sectioning could have been neat in order to make the design appear more tidy, this was something to take on board when recreating the look in my informal assessment.

Firstly i create a centre parting with my pin tail comb,
Then created three sections tw smaller sections and a larger section with the remaining hair.
next i secured the larger section in a ponytail
i then sectioned the hair into four and plaited one of the section.
then i applied hairspray to three sections and rolled the hair and secured each section in place with hair pins to create a Victorian style bun.
the i situated the plait around the bun.
i then curled the two sections of hair and secured the curls around the bun.
the two shorter sections of hair i curled and create sculpted ringlets which i applied hairspray to avoid them from dropping.
finally i applied decoration to the hair securing the feather and flowers around the bun.
 

Miss Havisham

equipment
dry shampoo
hair pins
hair curlers
flowers
pin tail com
sectioning clips
hair ties

Here is a photograph of final design from my second continuity assessment.
 
Firstly for my miss Havisham look i create a messy centre parting.
then i sectioned the hair into three two smaller sections and one large section.
next i secured the hair in a ponytail and sectioned each piece of hair applied hairspray to the section and rolled the hair to create a bun which i secured in place using hair pins.
Next i applied dry shampoo to the bun.
I then situated artificial flowers above the bun.
Next i sectioned the smaller sections into three each side of the head which i then rolled the hair and secured in place with hair pins.
The to roll on either side of the hair i applied the curlers to and created a sculpted ringlet on either side.
Finally i applied dry shampoo to the front of the hair.

Here is another photograph of my final hair design from my first continuity assessment.
 

Consultation notes

name: Kerry
Age: 22
Hair colour: Brown
Hair length: Long
Notes: N/A

practice look of Miss Havisham hair and makeup

Miss Havisham practice hair and makeup

Due to lack of timing and being confident with my makeup design I decided to focus more on my Miss Havisham hair design. I created a sketch on my final design but was unsure how to recreate the design on longer hair. After speaking to Helen she gave me some advise and a short tutorial on how to create the Victorian style bun in my design.
 
Health and safety
when using the curlers I needed to make sure the i did not get the curlers too close to the scalp due to the curlers getting quite hot.

Miss Havisham hair

equipment:
hair pins
hair ties
hair brush
pin tail comb
curlers
 
Here is a photograph of my first attempt and my Miss Havisham practice look.
Firstly I created a centre parting.
Then I sectioned the hair into three two smaller sections either side of the hear and a larger section using my pin tail comb and sectioning clips.
Then  I secured the larger section into a hair tie.
Next I took sections from the ponytail and roll the hair u towards the head and secured in place using hair pins .
Finally I created the ringlets by sectioning the hair and then working the curlers up the hair and applying hairspray to the ringlets to avoid them from dropping.
 
My first attempt at my Miss Havisham design i was slightly unhappy with, i wasn't too keen on the ringlets i felt they didn't work with my design and the Victorian style bun was situated too low therefore in order to become more confident with my design i practice it in my own time.
 
After speaking to Helen she suggested in order to make the Victorian style bun more secure when rolling the sections applying plenty of hairspray to each section.


Here is a photograph of my Miss Havisham hairstyle which i practiced in my own time due to the dolls head having slightly shorter hair i found it easier. I also carried out the same method as i did in my technical lesson.
 
In the technical lesson due to being unhappy with the ringlets on my model in my own time i decided to experiment with rolling the sections using the same technique as the i did for the Victorian style bun, the top roll I decided to form a sculpted ringlet due to it being much shorter than the rest of the hair, I felt this design would work better due to my models hair being long,

here is another photograph of my previous design by with decoration added to the design, after practicing my Miss Havisham design in lesson at home i became more confident with recreating the deign for my continuity assessment.
 

Makeup

Due to having a short amount of time to practice my Miss Havisham designs i decided o practice the makeup at home in my own time.  Due to being unsure of how to create my final makeup design for Miss Havisham which was a melted wax look i decided to speak to Sue who gave me advise on what product to use and where to purchase it, she also showed a tutorial in Thursdays technical lesson how to use gelatine to create special effects such as burns which was the product needed to create my final look, the technical lesson on creating burns also helped me to become more confident with using the gelatine.
 

equipment:

gelatine
camouflage pallet
kryolan foundation pallet
kryolan eyeshadow pallet
microwave
makeup brushes
paintbrushes
supracolour pallet
mascara wands
illamasqua loose powder
 
Health and safety
It is important to make sure the client is not allergic to any of the products used if the skin becomes red nd itchy the product must be removed immediately and rinsed under cold running water.
When removing the gelatine from the microwave it can be really hot so leave the gelatine to cool before applying to the clients skin also test the gelatine on the back of your hand to make sure its not too hot.
 
Using gelatine granules which I mixed in water then heated in the microwave I applied the mixed t half of my face using a paintbrush. when applied the mixture to my face I pointed the paintbrush up in order for the mixture t drop down the face in order to create a melted wax effect, then using a hairdryer on at a cool temperature I dried the gelatine. I carried out th process several times layering up the gelatine.

Next I applied a foundation from my Kryolan pallet which matched by skin colour I then applied the foundation  to my face and blended out using the buffer brush next using the camouflage pallet and a fine ma brush I highlighted any visible lines in order to appear more aged using, using a white from my eye shadow pallet I used this to act as a highlighter and highlighted the wrinkles.

I applied a light pink blusher to the cheeks to also highlight than makeup element and kept the eye makeup natural .

On the side of the face which didn't have the gelatine I created stipple skin and malnourished lips using a glue which I left to tacky and peel which I then covered over with a foundation.

Finally in order to portray the idea of Miss Havisham being burnt by the fire I used gelatine which I applied to the top left hand side of my face, which I then left to go tacky, then using my red from my surpacolour pallet I applied colour to area using a paintbrush in order to get a burned effect, I then applied another layer of gelatine to the area in order to give it a  shine and make the burn look dramatic.


Overall I was really happy with outcome of the makeup  and am considering using the idea for my final design. however I am going to practice the makeup design in order to become more confident with the design particularly with the aged makeup.
 

For my  second attempt at my final design, I used a different form of gelatine which was a slab of gelatine from screen face which I melted down in the microwave. I found this form of gelatine was thicker and worked much better than the gelatine granules especially for my melted face look.
In order to create my look I firstly applied a kryolan foundation to my face which I blended in using my buffer brush. One the side of the face which didn't not have the gelatine applied to the face using my camouflage pallet I started to add colour to any visible lines. I then highlighted over the visible lines using a white colour from my camouflage pallet.
next I melted the gelatine in the microwave and waited for the substance to slightly cool, in order to make the gelatine dry I used a hairdryer on a cool temperature.
I layered up the gelatine several times on the left side o my face in order to make the gelatine thicker and the drips more dramatic to look like melted wax.

I then applied a loose illamasqua powder over top of the gelatine to set the mixture and then used my kryolan foundation to bend into make the gelatine blend into the rest of my face . I then began highlighting the visible lines on the left ide of my face using a fine line brush, this was the make both sides of my face look aged and slightly even .In order to make the makeup seem a little Victorian I applied a light pink blush to the cheeks and a light grey colour to the eyes. Using a red lip liner pencil I went round my eyes to make my Miss Havisham character appear tired. I also applied a light colour to the lips
Finally to complete my Miss Havisham makeup I created a burn, by applying a layer of gelatine which I left to go tacky and then applied reds and a black from my supracolour and aquacolour pallet to make the burn seem more life like, once I had applied the colour to the burn I applied another layer of gelatine to make the bur seem sore and more dramatic.
Overall I was really happy with my design however in order to complete the burn I feel I needed to apply some blood and maybe Vaseline.
Finally to complete my Miss Havisham makeup I created a burn, by applying a layer of gelatine which I left to go tacky and then applied reds and a black from my supracolour and aquacolour pallet to make the burn seem more life like, once I had applied the colour to the burn I applied another layer of gelatine to make the bur seem sore and more dramatic.
Overall I was really happy with my design however in order to complete the burn I feel I needed to apply some blood and maybe Vaseline.


Consultation notes

client 1:
Name :Kerry
Age : 22
Skin type: dry
Skin tone: fair (alabaster foundation kryolan)
Eye colour: greyish blue
Notes: fair skin tone and freckles


Client 3
Name: Heidi (myself)
Age: 20
Skin type: dry
Skin tone: olive
Eye Colour : Brown
Notes: Olive skin tone / olive kryolan foundation base

creating Miss Havisam continuity

Continuity: creating Miss Havisham

equipment:

hair-

flowers
dry shampoo
hair pins
curlers
pin tail comb
hair brush
hair band
hairspray

Makeup

gelatine slab
kryolan foundation pallet
kryolan supracolour pallet
kryolan eyeshadow pallet
camouflage pallet
illamasqua loose powder
makeup brushes
mascara wand
hairdryer
bowl

Health and safety
firstly I had to make sure my model wasn't allergic to any of the products , if my model was allergic to any products i would have to use makeup which was uitable for sensitive skin.

If my models skin was slightly sensitive to any special effects products such as latex a barrier cream would be applied before.

if my model became allergic to any of the products i would have to rinse the product off immediately under cold running water.

when applying curlers to the hair i needed to be cautious of my models scalp as the appliance can get hot.

Technique :continuity part 1


I firstly created the hair for my Miss Havisham design. I firstly sectioned the hair into a centre parting, and sectioned two small sections of hair from the front of the hair line to just before the ear which will become ringlets. Due to recreating the Miss Havisham character when she starts to turn a bit crazy I wanted to highlight this through the hair by making sure that the    centreparting wasn't sleek and tidy.
Once I was happy with the centre parting I then tied the remaining section o hair into a ponytail, I then curled the ends of the ponytail using the curling tongs and used plenty of hairspray in order to make the hair easier to section and roll into a Victorian style bun , once I rolled each section of hair I then secured the section in place using a hair pin. In order to complete the Victorian style bun I secured slightly washed out flowers into the hair which I had stained using a tea bag.
Once I was happy with the Victorian style bun I the section the two sections at the front of the hair, into three smaller sections which I then rolled and secured in place using he same technique  did when creating the bun , the top hair roll at the front of the hair on either side of the head I curled using the curling tongs to create a ringlet, I carried this out after the makeup was completed therefore the curls would drop too much . In order to complete my Miss Havisham hair design I applied dry shampoo to portray the hair as slightly aged, however this may b a difficulty to recreate during the next continuity assessment. 

In this photograph the ringlets on the left side of the face have dropped however I feel this works with the makeup design due to the face being portrayed as melted.

Overall I was very happy with the hair design, I felt I managed my time well and the outcome was good due to the amount of practice I had. I was particularly happy with the Victorian style of bun but felt I could have improved on making the ringlets at the front of the hair more sculpted, however due to the Miss Havisham character being a crazy old women who lived in her wedding dress for many years the untidy ringlets tends to work .

When recreating my hair design the things I ill need to take into consideration, is the sections of hair which are sprayed using the dry shampoo, the untidy parting and the uneven ringlets.


For my final ideas for my Miss Havisham makeup design, I wanted to include my own fears into my design in order to highlight the use of gothic horror, I find dolls and wax works slightly eery therefore I wanted to makeup Miss Havisham appear as if she was made out of wax as well as porcelain in my design. However due to the makeup having to be close to the historical period I was concerned that my makeup was a little contemporary, after speaking to Kat on a one to one tutorial she explained my design would work as a metaphorical interpretation of Miss Havisham as long as I kept the makeup application Victorian.
In order to create my Miss Havisham makeup design, I firstly applied a light foundation to my models face neck and ears taking into consideration blending the product into the face. Next I heated gelatine in the microwave , whilst the mixture was cooling slightly I started to make the other side of the face appear aged, by using my eye shadow pallet from kryolan and my camouflage pallet to make any visible lines stand out on the face, then using a lighter colour I applied this slightly around the lines to act as a highlighter. next I contoured the convex areas of the face using a grey from my kryolan eye shadow pallet.

Once I was happy with how the aged side of the face looked i then began to apply the gelatine to the face by using a paintbrush which  pointed down the face in order to create a drip effect, once I applied the first layer I slightly dried the gelatine by using a hairdryer on a cool heat I then applied a second layer of gelatine using the same process. Once the gelatine was dried I then used my illamasqua loose powder to secure the gelatine, next I applied the light colour foundation of the gelatine to make it look more like flesh, then using my kryolan eyeshadow pallet, and camouflage pallet I created the aged look overtop of the gelatine by mirroring the makeup on the other side of the face.
Finally in order to complete my look I applied a pallet white from my camouflage pallet to the lips, a light pink to the cheeks to add a subtle colour, a grey to bring out the eyes and the yellow and white fro my supracolour pallet which I mixed together and applied to the brows and lashes using a mascara wand.
Overall I was very happy with the makeup design I had created, the wax effect created a metaphorical interpretation of the Miss Havisham character from the great expectations, and the makeup on the other side of the face appear aged and the colour scheme I used highlighted the Victorian era makeup. The only thing I found difficult was making my model appear aged, this caused me to become a little worried about time keeping.
 

continuity part 2

Before my second part of the continuity exam I made sure I had updated my original tutorial including any extra products or significant changes I had made. On my face chart which originally included a burn situated across the forehead which I decided not to use in my final design, I made a note that it was not included in my first assessment for the examiner to see. On my hair chart I labelled the different elements incorporated into my final design .I also printed off my images of the front and the side of the face and the back and the top of the hair to make it easier to identify where the gelatine drips are situated , how many curls are styled into the Victoria bun and where the dry shampoo can been seen prominently in the hair.
 For my second part of the continuity assessment I firstly design the hair, creating an untidy centre parting, next I section the hair into the three sections two small sections either side of the head for the sculpted ringlets and a larger section to create the bun . Next I secured the larger section into a ponytail and curled the ends using the curling tongs , analysing the photograph from my previous assessment several rolls were situated in the hair to create the Victorian style bun, therefore I sectioned the ponytail into several sections and applied hairspray to make it easier to create the bun. Once I had created the bun I analysed the photograph to see where the dry shampoo had been situated . I then secured the flowers above the bun and finally sectioned the front two sections into three and using the same process as creating the Victorian style bun I created three rolls either side of the head , the top section I secured in place until after I completed the makeup then I created two even ringlets either side of the head. 
When recreating my Miss Havisham makeup, I firstly applied a light coloured foundation from my kryolan pallet to the face, then I heated the gelatine in the microwave. Whilst the gelatine was cooling I started to make the other side of the face appear more aged by applying a brown from my camouflage pallet, and a grey and brown eyeshadow to any visible lines. Next I  highlighted the wrinkles using a light colour from my camouflage pallet to make the wrinkles appear more dramatic. Using a grey from the kryolan eyeshadow pallet I applied the product to the convex areas of the face to make the face appear more dull and shadowed. Using the pink from my kryolan eyeshadow pallet I applied subtle colour to the cheeks. Using a white from my camouflage pallet I made the lips appear aged. I then applied a brown and grey from my eyeshadow around the eyes and finally applied a yellow and white to the lashes and brows to make my model appear more aged.
Once the gelatine had slightly cooled I created several drips on the face, by pointing the paintbrush downwards, analysing the image from my previous assessment I created three gelatine drops three on the forehead four on the cheek , one down the nose and above the lips and two dripping down the chin off the face. I then applied the hairdryer at a cool temperature to dry the gelatine and carried out the same process again , I then used my loose illamasqua powder to set the gelatine and applied a layer of foundation over the gelatine to make it appear more like flesh, I then mirrored the other side of the face using the same products on the aged side of the face. 
I found that printing my images off from my previous assessment made t easier to identify how the hair and makeup was styled. I felt the was styled similar to the first assessment , however the only thing I found difficult and looked different to my first design was where the dry shampoo was situated although it tried my best to make sure it was situated similar to the first design , I applied more pressure making the hair appear more white in comparison to the previous assessment.
I felt that the makeup looked similar to the first assessment in terms of the gelatine drips however, I felt the makeup was softer and the face appeared less aged in the second continuity assessment.
In the second continuity assessment, I felt that I was calm and managed my time well , I also felt I did a good job at making the hair and makeup appear the same as the first continuity assessment , however I would change the amount of dry shampoo I applied in the hair .


Consultation notes

client 1:
Name :Kerry
Age : 22
Skin type: dry
Skin tone: fair (alabaster foundation kryolan)
Eye colour: greyish blue
Hair colour: brown
Hair length:long
Notes: fair skin tone and freckles


Historical victorian hair

Historical Victorian hair

lesson summary: to create different hairstyles from the Victorian period using curling and plaiting and rolling techniques .

equipment:
curlers
pin tail comb
hairbrush
hair pins
hairspray
sectioning clips
hair band

Health and safety
Be careful not to burn the clients scalp in particular when curling the hair as the equipment can get hot.

Firstly I create a prominent centre parting using tail comb.
The I sectioned the hair into three sections one large section and two smaller sections which start at the front of the hair line and finish just behind the ear, using my pin tail comb and sectioning clips.
once the hair was sectioned I firstly began creating the ringlets either side of the head using my hair curlers.
In order to create the ringlets I sectioned a small piece of hair from one of the sections and began to work the hair up the curlers towards to root using my pin tail comb to tuck in any loose ends.
When creating the ringlets for the 1830s early Victoria hairstyle it was important to have exactly the same amount of ringlets on either side.
 
Once I had created the ringlets with the larger remaining section of hair I created a simple bun.
 
The picture above shows my first attempt at an 1830s hairstyle however I found it slightly difficult to create a bun on the dolls head due to the length and amount of hair.


Here is another attempt at a Victorian hairstyle in Helens lesson.
Firstly using my pin tail comb I created a centre parting also looking in my mirror to make sure the parting was in the centre.
next I create three sections two small sections at the front of the hair to just behind the ear for the ringlets and a larger remaining section for a Victorian style bun using my pin tail comb and sectioning clips.
Then I plaited the larger section of hair and styled it into a plaited bun which I secured in place using several hair pins.
Then I created the ringlets on either side of the head taking into consideration exactly the same amount of ringlets were to be sculpted on either side of the head.
I created the ringlets by working the curlers up the hair using my pin tail comb to tuck in any loose ends.  
Once enough heat was applied to the hair I released the curlers and applied hairspray to the curls.
finally my model had a outgrown fringe in order to incorporate another technique into my design I plaited the shorter pieces of hair and secured them to the bun using several hair pins


Here is another Victorian hairstyle which I attempted in Helens technical lesson.
Firstly I sectioned the hair into a centre parting using m pin tail comb.
Then I sectioned the hair into three using my pin tail comb and sectioning clips
hen using my curlers and pin tail comb I create the equal amount of ringlets either side of the head which I applied hairspray to in order to avoid them from dropping significantly.
Next I tied the larger section of hair into a ponytail .
I then took small sections of the ponytail with my pin tail comb which I applied hairspray to and began to roll up towards the head which I then secured in place with a hair pin.
I carried ot the same process taking sections of hair in order to create a Victorian style bun.
finally any loose pieces of hair in order to avoid the hairstyle from looking untidy I apply the curlers to the hair.


In my own time I create a Victorian style hairstyle.
Firstly I created a centre parting with my pin tail comb.
next I sectioned the hair into three two small sections either side of the head and one larger section.
The I secured the larger section in place with a hair tie.
The I took sections of the ponytail which I applied hairspray to and rolled up towards the head I then secured the rolls in place using hair pins .
I carried out this process In order to create a Victorian style bun.
I then incorporated two plaits into my design which I secured in place underneath the bun.
Finally I sectioned the front two sections into three smaller sections either side which I three rolled and secured in place using hair pins.
 

Here is another photograph of the previous hairstyle but with the first roll at the front of the head curled into sculpted ringlets.


Here Is another photograph of the previous hairstyle but with decoration applied to the hair in order for I to appear more Victorian.


Here is a photograph of my sketch of an early Victorian hairstyle. The image conveys the use of flowers as decoration, the centre parting, ringlets situated either side of the head and a Victorian style bun.


Here is a sketch of my interpretation of another early Victorian hairstyle the Apollo knot, the technique includes a centre parting, ringlets, a rolled or looped styled bun finished with a plait and some floral decoration
 

Consultation notes

Name: Kerry
Aged:22
Hair colour: Brown
Hair length : long
Notes: N/A

Burns

Burns

Equipment

gelatine- slabs/ bottled/granules/gellac(different colours)

supracolour

barrier cream (optional)

latex or colodion (optional)

tissue paper(optional)

bowl

sponge

water

foundation pallet

Vaseline(optional)

fake blood

fake puss

paintbrushes

spatula


How to use the different types of gelatine in order to create a burn :

if you are using gelatine slab cut of a small amount into a bowl and heat in the microwave for approximately 20 seconds until its a runny liquid.

If you are using bottled gelatine but the bottle in a bowl full o water and heat in a microwave a whole bottle usually takes a minute to melt count for 20 seconds take the bottle out of the microwave and shake then heat again in the microwave until a runny liquid

if you are using granules pour the granules into a bowl add a small amount of water stir and put into the microwave until it a runny liquid.

Health and safety

make sure the client is not allergic to any of the products before use.

If the client has sensitive skin apply a barrier cream to the area before applying the product.

If the client is unsure if they are allergic to latex using a cotton swab apply to a small area if the area becomes red and itchy remove immediately.

some  clients may not approve of the use of gelatine if this is the case there are also vegetarian gelatines available to use to make your client more comfortable.

once te gelatine has been melted in the microwave leave to cool as the substance can be hot, before applying to the clients skin firstly test on the back of your hand.

Technique

Firstly heat the gelatine in the microwave.
Once the gelatine  has melted leave to cool slightly before applying to the area.
Next apply the gelatine to the area making sure there are no rough edges using spatulas.
using a hairdryer on a cool heat dry the gelatine so its tacky and not wet.
keep layering up the gelatine to the skin using a spatula and dry with a hairdryer to mae it tacky, tissue paper can also be used to layer up the burn with no hard lines and supracolour can also be added to the gelatine to add colour.
latex is another product which can be feather using a sponge in order to layer up the burn
Once the gelatine is layered up enough and dried apply a loose illamasqua powder over the gelatine to set the product.
next add colour from your supracolour such as reds blacks and yellows to make the burn seem more realistic.
blood and fake puss can also be applied to the burn to make the burn appear more realistic.
Apply colour from the foundation pallet from kryolan in order to make the burn seem more realistic with burnt flesh , also by using a foundation base which matches the clients skin tone this will help the burn to blend into the arm better and make it appear more realistic.
finally in order to make the burn seem deeper and more sore apply Vaseline to the area .

remove the gelatine using warm water on the area .
The photograph shows my first attempt at creating a burn using the gelatine slab.
 

Consultation notes

client 1:
Name :Kerry
Age : 22
Skin type: dry
Skin tone: fair (alabaster foundation kryolan)
Eye colour: greyish blue
Notes: fair skin tone and freckles/ alabaster foundation